
How to Fix Winged Shoulder Blades
Nov 22, 2016
So, what are winged shoulder blades?
If you look at the image above, you'll see a young boy with winged shoulder blades (scapulae). While looking at the image, notice the pen marks on the inner edge of the scapulae where these bones are sticking out from his back. There, you'll notice that there is a gap between his rib cage below and his shoulder blades above. Ideally, the shoulder blades would sit snugly on the rib cage with no space. Actually, this ideal position is shown in the image below.
Now, ask yourself: Do you have winged shoulder blades?
Before you read further, take a look! In order to do this well, ask a friend or family member to visually examine, or take a photo of, your back. If you see your shoulder blades pulling away from your back, you might have winged scapulae.
Alternately, you could ask your friend or family member if they can easily fit their fingers up under your scapula, thus revealing extra space between your shoulder blade and rib cage. Also, while examining, you may notice your right and left sides are not equal. While this is not uncommon, this misalignment can cause some issues.
So, what’s the problem with winged shoulder blades?
Well, whenever the body is out of position, there is weakness. As you know, alignment is strength! If you have winged scapulae, your body isn't as strong as it could be. In other words, there is some weakness and lack of proper function in the upper body. These muscle imbalances often cause compensations, where other muscles and joints do the work of the weak structures. As a result, you could have pain from overuse. Also, there may be chronic increased muscle tension, such as in the top of the shoulders and into the neck or in the mid-back. Sound familiar? Another issue is that shoulder range of motion is frequently reduced. This causes the risk of injury, including damage to the rotator cuff, to increase.
Now, how did the shoulder blades become winged?
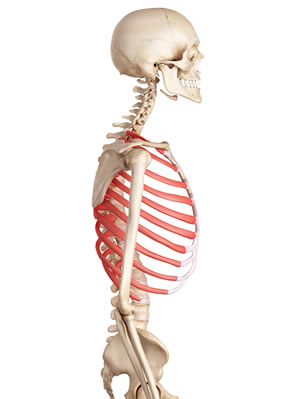
There could be several reasons. However, I am going to answer this question based on a common postural adaptation that often happens because of faulty breathing mechanics. First, take a look at Figure A below. This image shows the scapula, rib cage and diaphragm in good position. (In case you were wondering, the diaphragm is depicted as the top of the red curved line within and in front of the skeleton.) A similarity between the image above and Figure A is that there is no space between the shoulder blade and the rib cage.
In contrast, Figure B depicts a poor postural position. Instead of being aligned, the lower part of the rib cage has moved up and forward, away from the spine and shoulder blades. Also, the diaphragm is flattened out. When the rib cage rotates in this way, it creates space between the scapulae and the rib cage. And, this creates the appearance of winged shoulder blades.
But how does this relate to breathing?
 |
 |
| Figure A | Figure B |
| This figure is used with permission from the Postural Restoration Institute© © 2016, www.posturalrestoration.com. | |
Now let’s turn our attention to the squiggly red line in the figures. As I mentioned earlier, the top of this red line represents the diaphragm, which should be the primary muscle of breathing. When we are breathing with good mechanics, the diaphragm returns to the domed (or hooked) position. Figure A shows this. However, when we are breathing poorly and thus are not exhaling completely, excess air becomes trapped in our system and the diaphragm doesn’t return to its fully relaxed (domed or hooked) position. Figure B shows this issue. If you look at figure B, you'll see that the extended-forward position of the diaphragm pulls the rib cage forward and away from the scapulae. This, then, causes the winged shoulder blades.
Three Keys to Fixing Winged Shoulder Blades
In order to correct winged scapulae, the rib cage must be rotated back to a neutral position. In other words, the lower part of the rib cage needs to move down toward the pelvis, back toward the spine, and in toward your center. To do this, you will need to retrain the following three factors through strengthening and integration exercises:
- Breathing Mechanics
- Abdominal Muscles
- Serratus Anterior Muscle
1. Breathing Mechanics
First, you will need to focus on having a complete exhale and expelling all of your air out. This allows the diaphragm to relax back into its domed position, which will rotate the rib cage down, back and in. Thus, it will eliminate winged scapula. The muscles that are needed to support this rearward rotation of the lower rib cage are the abdominals on the front of the body and the serratus anterior in the back.
If you’d like more information on breathing and posture, please check out these blogs:
First, read
My Low Back Hurts Because I Can’t Breathe!
Then, read
Improve Core Stability and Posture with Diaphragm Training
Finally, read
The Secret Role of Your Abs
2. Abdominal Muscles
Next, let's focus on the abs. The abdominal muscles --external and internal obliques and transversus abdominis-- are exhalation muscles. To explain, they assist in compressing the trunk and lungs to squeeze the air out of the body. As you can see in the images above, all of these muscles have connections to the rib cage. When these muscle activate and shorten through forced exhalation, the rib cage moves into a more neutral position.
 |
 |
 |
| Exernal Obliques | Internal Obliques | Transverse Abdominis |
| Source: Kendall, F. P., McCreary, E. K., Provance, P. G., Rodgers, M. M., Romani, W. A. (2005). Muscles Testing and Function with Posture and Pain Fifth Edition. Baltimore, MD: Lippincott Williams & Wilkins. | ||
3. The Serratus Anterior
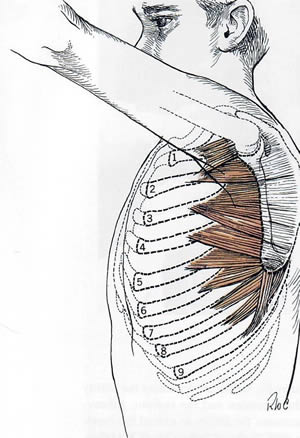
Now, we'll look at the serratus anterior. If you note the image to the left, you'll see that this lies between the rib cage and the scapulae. Recall that the abdominal muscles pull the lower rib cage down, back and in on the front of the body. Similarly, the serratus anterior rotates the top of the rib cage up and into the shoulder blades. The serratus anterior must be strong in order to maintain the connection between the rib cage and scapulae without gaps or winging.
Source: Kendall et al. (2005).
Exercises to Fix Winged Shoulder Blades
Here are some exercises you can do to affect the three above components. These exercises are adapted from the Postural Restoration Institute© course, PRI Integration for Fitness and Movement. When you try them, I recommend doing them in the order presented. If you find these exercises too advanced, instead, please start with the exercises on my blog, 3 Exercises for Better Upper Body Posture.
Note: During all of the exercises presented, you will inhale through your nose and exhale out your mouth.
Knees to Chest
Starting Position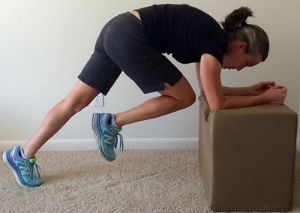
First, begin in a plank position on a box, chair or bench, which is at your knee height or lower when standing. After you're in position, place your elbows directly below your shoulders and extend, but do not lock, your legs straight behind you. Now, round your back by engaging your abdominals to pull the front of the pelvis up and ribs down.
While you do this exercise, think about rotating your rib cage up into your shoulder blades and pushing your back to the ceiling. In addition to feeling the work in your abdominal muscles, you should also feel the serratus anterior muscle tension directly under your shoulder blades. Maintain this upper body posture throughout the exercise.
Movement and Breathing
While in this position, with both feet extended and your feet on the ground, inhale into your back. Then, push down into your elbows and forearms. Meanwhile, engage your trunk, and round your back (as described above). Now, as you exhale, bring your knee into your chest. Then, return the leg back to the extended position. At this point, inhale again, and then check your upper body position before you exhale. Repeat the movement with the other leg. You will alternate bringing the knee towards the same side arm, opposite arm and center. Repeat 5-10 times on each leg. Then rest and perform additional sets, if desired.
Side Plank with Bent Elbow
Note: Since you will be balanced on the sides of you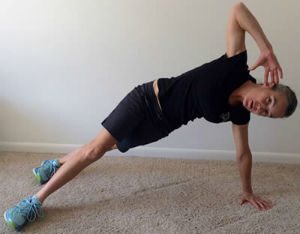 r feet during this exercise, I recommend using shoes for support and comfort.
Starting Position First, begin lying on your side with your top leg in front of your bottom leg. Now, position yourself so that your torso and upper body is centered between your legs and aligned from your pelvis to head. If you're in the correct position, your hips will be on the ground and your bottom arm will extend directly below your shoulder.
Movement and Breathing
Now, bring your top arm up, bending at your elbow with your fingers at the level of your ear. Then, pull both shoulder blades down and together. At this point, you should feel the muscles between the spine and scapulae become tense. While here, keep your head looking straight ahead. This can actually be harder than it sounds! This was the only picture I have in which I wasn’t looking down.
Next, lift your hips off the floor, and push into the floor with your extended arm to engage your serratus anterior. When you do this, you will feel the tension between the rib cage and scapulae. If you look back at the image, you will notice that I have pulled my left hip back behind my right. This increases the activation of your abdominal muscles, taking the strain off your back.
Now, as you pull your hip back, also bring your pelvis under. Be sure to use your abs to prevent back extension (arching). Finally, breathe deeply into your back and sides while keeping your pelvis tucked and abs engaged. Hold this position for 30 seconds to one minute. Repeat on the opposite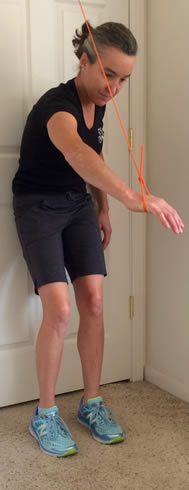 side.
side.
Forward Punch
Starting Position
This exercise can be done with a piece of tubing anchored behind you, or on a cable machine at the gym. Whichever method you choose, keep the resistance light to start. When you view the image to the right, you'll notice that I have secured the tubing in the door frame by knotting the end of the tube. If this works for you, try it.
Now, let's get started. First, stand facing away from the door or cable machine with your bottom supported, and keep your lower back flat and abdominals engaged. While in this position, think of reaching your upper back towards the door or machine as your abdominals engage to hold your rib cage position in the front. Next, place your feet parallel to each other. When you do this, notice the weight in your heels. Be sure to keep your weight back in your heels with light toe contact and awareness of your arches throughout the exercise. Finally, slip your hand through the loop of the tube or handle of the machine. You are now ready to start!
Movement and Breathing
Now that you're in this starting position, bend your knees into a small squat. If you look at the image, you will notice that my right knee is bent more and is slightly ahead of my left. This is assisting me to shift and center on my left leg. When you reach forward, this should happen naturally. Next, as you exhale, reach the arm forward that is holding the resistance. Be careful to reach the arm down, below shoulder height. You want to engage your serratus anterior, under the scapulae, and not your deltoids on the top of the shoulder by your neck. In order to feel the correct muscle, you may need to adjust your arm position lower. Sometimes, I've also found that keeping a slight bend in my elbow helps.
As you reach forward on one side, you will notice your weight shifting to the opposite side. This causes an increase in the abdominal contraction and heel pressure on that side. In the photo, while I am reaching with my right arm, the contraction of my left abdominals increases. So, too, does the pressure in my left heel. You should feel this, as well. Now, hold this position for 30 seconds to 1 minute.
On each exhale, reach farther forward, being aware of maintaining correct form in your torso --lower back flat, abs engaged, rib cage pushing towards the door --and pressure in your feet-- heavy heels, light pressure on the toes and awareness of your arches
Summary
As you have read, poor breathing patterns that alter posture can cause winged shoulder blades. Primarily, exhalation is not complete, leaving residual air in the system that leaves the diaphragm extended. Since the diaphragm is located within the rib cage, its failure to relax and redome affects the position of the rib cage. The result is that the lower rib cage is pulled up and forward in front and rotates beneath and away from the scapulae. This change in rib cage orientation creates space, or winging, between the rib cage and shoulder blades. In order to fix winged scapulae breathing mechanics, you must retrain and strenthen the abdominal muscles and the serratus anterior muscle. This will reposition the rib cage and reconnect it with the shoulder blades.
In other words, winged scapulae can be fixed! If you try the exercises above, you'll find that they will help reposition your upper body when done consistently, three or more times a week. And, like any strengthening exercises, you should notice improvements quickly in your ability to perform the exercises as your body becomes more efficient in the movements.
Further strength gains will take six weeks or more. In addition to gaining greater shoulder mobility and strength while reducing your risk of injury, you may also experience less tension and stiffness in your upper body. This is because those overworked muscles are finally being able to relax since the body is beginning to function correctly again. Also, your breathing will improve, which is likely to give you more energy and better sleep. Finally, it may also enhance the action of many of your body systems. Thus, if you fix your winged scapulae, many other benefits will follow! Get started today--and feel free to contact me if you have questions.
Stay connected with news and updates!
Join our mailing list to receive the latest news and updates from me.
Don't worry, your information will not be shared.
We hate SPAM. We will never sell your information, for any reason.