
5 Steps to Fix a Knot Under Your Shoulder Blade
Jun 10, 2020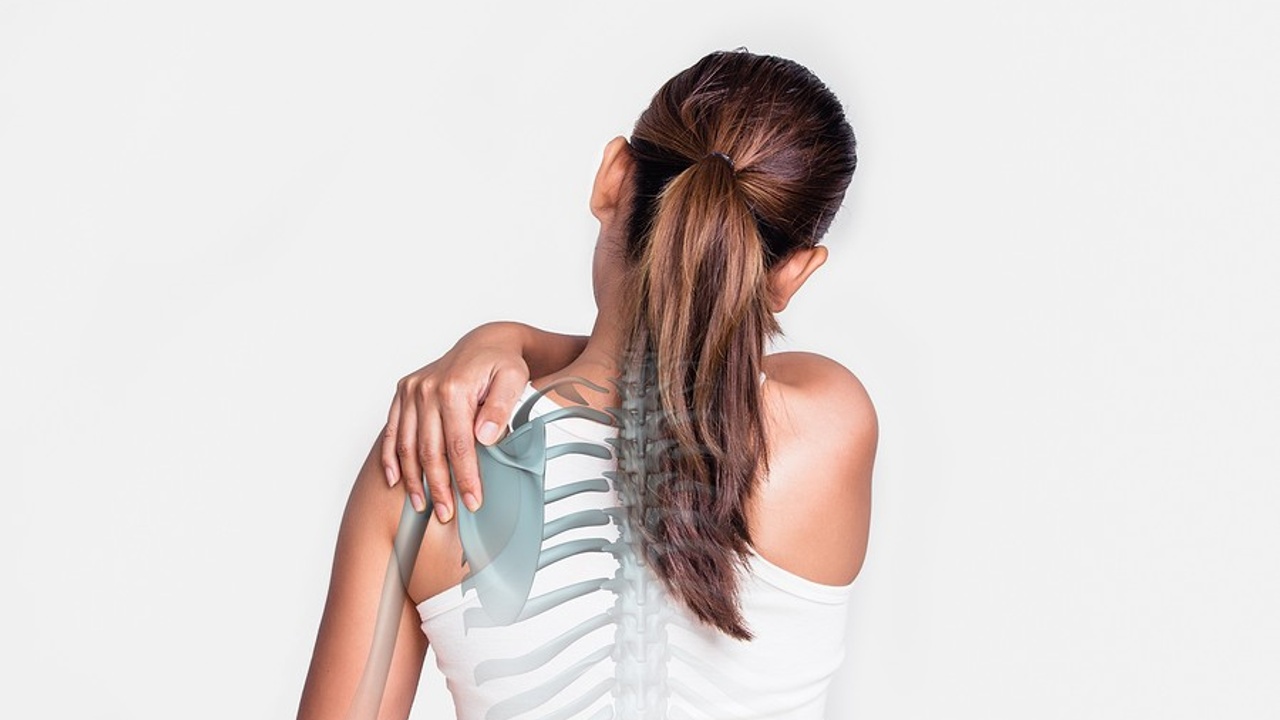
Have you ever had a knot under your shoulder blade? One that hindered your movements? You are not alone. Most painful knots under the shoulder blade (scapulae bones) are due to tension buildup within the soft tissues. In this blog, I address how to break up and mobilize this tissue. I’ll also offer suggestions to prevent future incidents of pain.
Step 1: Release Trigger Points
 Trigger points are those hard, unyielding knots in your muscles that are sensitive to touch. These stuck and tight tissues need to be broken up. You can do this yourself with a foam roller, massage ball or even a tennis ball. To demonstrate, look at the picture of me leaning against the wall. As you can see, I have the ball directly behind my shoulder blade on the sensitive spot. Depending on how tender the area is, you may want to start by standing with your back to the wall. Lying on the ball on the ground may be too intense, which could cause the muscles to actually tighten up more because of too much direct pressure. Thus, a slow, gentle approach is best.
Once you have the ball positioned on the knot, there are three techniques you can use:
- Keep the ball directly on the spot and slowly let your body weight sink into the ball as the tissues gradually yield. Use your breath to relax. With each inhale, visualize your torso expanding, and direct that expansion into the knot, creating length and space within the tissues. With time, the spot will ease. At this point, move the ball just slightly to one side of the initial spot. You will likely find several smaller knots near the original site of pain. Continue around the area until the sensitivity has diminished.
- Next, with the ball directly on the knot, slowly rock your body side to side over the sensitive area. This is called “cross frictioning.” The idea is that you are moving across the muscle fibers perpendicular to their orientation. Alternately, you may find moving up and down is also effective, depending on the location of the knot. Continue doing this and expanding your circle out from the sore area until the tenderness has improved.
- Now, holding the ball on the knot, slowly move your arm--up, sideways, down and back, and any direction that creates a gentle pull on the tissues in and near the knot. As a result, the tight tissues will open and expand.
Aside from self-myofascial release with the roller or ball as described, you can also have a professional massage and/or direct injections or dry needling into the trigger point to break up the knot.
Step 2: Move Your Shoulder Blades
It's important to know that movement increases circulation to the stiff area, enhancing pain relief. Since the knot behind your shoulder blade is basically a clump of stuck tissue, after releasing the trigger points, you should move them. Now's a good time because these released tissues are now more pliable and ready to be re-trained with exercise.
The shoulder blades have three basic movements: up and down (elevation and depression), in and out from the spine (adduction and abduction--also known as retraction and protraction), and rotation upwards--toward the head, and downwards--toward the feet. The following three Egoscue Method© exercises move the scapulae through each of these three ranges of motion.
Shoulder Shrugs
This exercise moves the shoulder blades up and down along the spine.
 |
 |
- Stand with your back to a wall. The wall is acting as a template for correct alignment of your load-bearing joints--ankles, knees, hips and shoulders. Point your feet straight ahead with your heels touching the wall, or as close to it as comfortable. You should feel your butt and mid-back on the wall. Your head may or may not be touching the wall, depending on the amount of rounding in your upper back. Keep your chin parallel to the floor. As your upper back lengthens, your head will move closer to the wall.
- Notice how your shoulder blades are contacting the wall--it may be different left to right. Moving from your mid-back, not by pulling with your arms, move your shoulder blades backward so that they have greater contact on the wall. You should feel tension between your shoulder blades and spine as you do this.
- Maintaining the increased contact of your shoulder blades on the wall, slide your shoulder blades up toward your ears.
- Next, and more importantly, press your shoulder blades down toward the floor to increase the space between your ear and the top of your shoulder. You may feel a stretch in your chest, neck and upper back. Tension should develop below your shoulder blades as these muscles engage to move your scapulae down.
- Repeat for at least 10 repetitions. It is common to hear lots of popping and cracking as you do this. This should reduce with time.
Elbow Curls
This exercise moves the shoulder blades in and out from the spine.
 |
 |
- This exercise can be done standing (same set-up as above), sitting, kneeling, or on your back on the floor in the hooklying position (knees bent at 90 degrees, feet flat on the floor and arms out to your sides with your palms up). I prefer standing or lying on the floor so that you can receive feedback from the surface behind you on your position.
- First, curl your fingers into the palms of your hands. This engages your forearm muscles, helping to lock out your wrists. Keep in mind that you want to keep your wrists straight as you do this exercise.
- Then, bring your knuckles up to the sides of your head, and press the knuckle of your middle finger lightly into your temple.
- Press your shoulders down while subsequently checking that you haven’t lifted your chest or arched your lower back. Whenever we lift the arms up, the shoulders and chest tend to follow.
- Now, exhale out your mouth as you slowly bring your elbows toward each other. Feel the scapulae move sideways out from the spine and wrap around your rib cage. You may or may not be able to touch your elbows. Keep your upper arms parallel to the floor without dropping down.
- Next, inhale through your nose and open your elbows out to touch the wall behind you, if possible.
- Keep your thumbs pointing down throughout the exercise. There is a tendency for the knuckles to twist as you move, so make sure that isn’t happening. Do this in front of a mirror to check your form.
- Repeat 10-20 repetitions.
Arm Glides
This exercise rotates the shoulder blades upward and downward.
 |
 |
- Stand at the wall as described above.
- Bring your arms up into a goal post or cactus position with a 90-degree bend in your elbows, and make a gentle fist with your hands. Try to have the backs of your shoulders, arms and hands touch the wall.
- Now, press your shoulders down. Check that you haven’t lifted your chest or arched your lower back. Whenever we lift the arms up, the shoulders and chest tend to follow.
- While maintaining the 90-degree bend in your elbows, slide your arms up so that your hands meet on top of your head as you exhale out your mouth. Do your best to keep your shoulders, arms and hands on the wall as your scapulae rotate up and out away from the spine. Admittedly, this is a very challenging exercise for me, as you can see by my grimace when my hands are at the top. If you struggle like I do, start on the floor, where gravity is assisting you in the movement.
- Inhale through your nose as you lower back down to the starting position. As a result, you should feel the scapulae rotate down and in toward the spine.
- Repeat 10 repetitions.
Step 3: Consider WHY the Knot Developed

Generally, knots only develop under one shoulder blade, not both. The question to consider is--WHY--as I discuss in my blog, The Most Important Question to Ask About Your Pain.
Often, we believe that shoulder blade knots are a result of overuse, such as doing too much too soon, progressing too fast, not allowing adequate rest, or stressing the upper body repeatedly with different activities that require substantial upper body involvement (swimming, golf, tennis, paddling, yard work. . .).
Your body was able to maintain pain-free movement until you pushed yourself a bit more than usual; as a result, your tissues yelled out for your attention by creating pain. Now, recall the definition of pain: “Pain is a sensation that provides us with information about how our body is functioning. It is a warning sign that something is wrong,” read more.
Of course, overuse may be a contributor, but the question remains: Why does only one side hurt? What is different about this side over the other side?
Some sports--racquet sports and golf particularly--are biased to one side over the other. Unless you are ambidextrous and carry both left and right-handed golf clubs in your bag, for instance, your swing is repeated in the same direction time after time.
Even if your sport is relatively symmetrical, think about how you move throughout your day. Depending on your handedness--left or right--preferences are apparent in how we move. Naturally, we tend to use our dominant hand for most tasks, which biases our body to rotate in a certain direction, causing us to develop asymmetrical strength and tension patterns within our upper body.
Repeating these biased movements over and over ingrains a lopsided body position, often with the shoulder blades in unbalanced positions and many times with a fixed rotation of the spine. Most of my clients--whether athletes or not--have a difference in their shoulder blade position simply due to the uneven nature of the tasks of daily living.
Thus, your body is in a compromised position before you enter into intense activity and sport. Because of these asymmetries, the way you can move is altered, which sets you up for possible injury and pain.
Step 4: Reposition and Strengthen the Upper Body
To prevent injury and shoulder blade knots from developing, the upper body needs to be balanced with the scapulae in symmetrical postures.
A Quick Anatomy Lesson
The shoulder blades are located at the back of the body, sitting atop the rib cage. When considering shoulder blade position, we would be careless and incomplete not to also consider the posture of the rib cage. Just looking at the size of the bones, the rib cage is much larger than the smaller scapulae and provides underlying support for the shoulder blades.
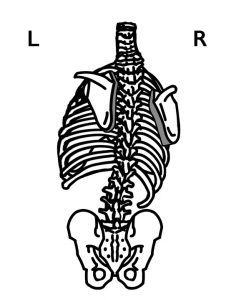 In the image, the rib cage is rotated to the left, which impacts shoulder blade position. This is a common pattern, referred to as the Right BC pattern by the Postural Restoration Institute (PRI), that I see in many of my clients. You’ll notice that there is more space between the right shoulder blade and rib cage as compared to the left because of this twist. In addition, the shoulder blades are in different positions relative to the spine. This imbalance can become exaggerated through our movements, and, consequently, these poorly-balanced movements lead to greater imbalance, pain and annoying knots.
How to Regain Balance
It is the position and condition of the body brought into activity that determines if you will develop overuse knots and pain. Unfortunately, bringing a twisted body into a high intensity, repetitive sport for consecutive days can cause strain and tension to develop.
When the bones are asymmetrical, the muscles are also out of balance. Muscles dictate the position of the bones. In order to reposition the upper body, the muscles need to be equalized through exercises. In this case, it is the abdominals and serratus anterior that need to be evened out.
For more information, you can read about th ese muscles as well as three exercises to bring the rib cage and scapulae back into balance in my blog, How to Fix Winged Shoulder Blades. Also, you can join the Core Challenge for additional information and exercises. Clearly, the position of the rib cage is vital to a strong core.
Step 5: Maintain a Symmetrical Body Position
Unfortunately, once the knot and pain are gone, your work is not done. Because of the asymmetrical character of daily lifestyle patterns and some sports, your body will gravitate back to its crooked, painful position without conscious intervention.
This simply means you’ll need to do some consistent exercises to maintain a balanced body. You can easily incorporate these--in only a few minutes--into your warm-up and cool-down sports routines, strength and stretching workouts, or throughout the day--whatever you can commit to and do regularly. First, though, start with the exercises in this blog.
Schedule a Free Consultation
If you’d like to take a more personalized approach or talk about your unique circumstances, contact me to schedule a free consultation.
Stay connected with news and updates!
Join our mailing list to receive the latest news and updates from me.
Don't worry, your information will not be shared.
We hate SPAM. We will never sell your information, for any reason.