
3 Exercises to Relieve Neck Pain
Dec 15, 2022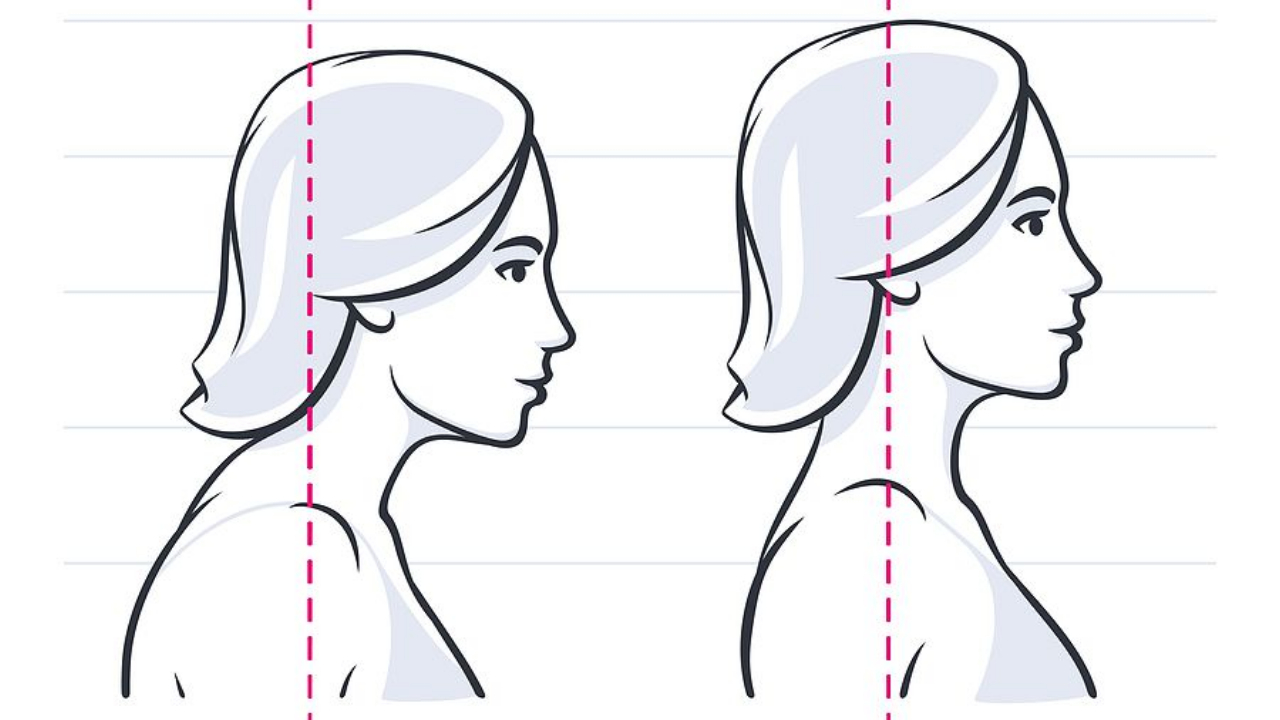
This is the second blog in a two-part series on neck pain. Read the first blog: Neck Pain and Posture. This is a collaboration with Dr. Michael L. Rothman, M.D. Dr Rothman is a former orthopedic surgeon and Advanced Exercise Therapist (AET), certified by the Egoscue Institute.
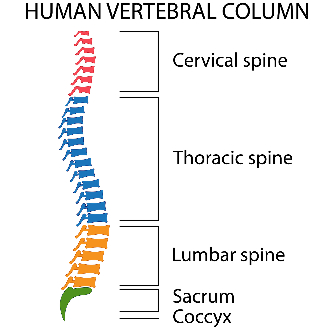 Neck pain is often the result of poor posture. As discussed in the previous blog, the neck consists of seven cervical vertebrae at the top of the spine. The position of these vertebrae depends on the position of all the vertebrae below, including the fused vertebrae of the sacrum and coccyx, which are part of the pelvis.

When the neck is misaligned, the spine segments below compensate. This can be seen in posture issues such as forward head posture, where the cervical vertebrae are rounded forward, or military neck posture, where the cervical vertebrae are too straight. The spine needs to balance against gravity. If one section of the spine, such as the neck vertebrae, has lost its natural curve, the other vertebrae change the shape of their curves to adjust and maintain a balanced position.

 Examples of spinal compensations for poor neck posture include increased lumbar (lower back) lordosis, left image, or thoracic (mid-back) kyphosis, right image. These postural deviations are shown in red in the images. Also, compare the pelvic positions in the two images. In the lordosis image, the pelvis has moved forward into an anterior tilt. It has moved down and forward, and the tailbone is lifted up and back. However, this is not the case in the kyphosis image. This pelvic tilt is an example of compensation between the spine and pelvis as the spine attempts to maintain a balanced position against gravity.
Clearly, the entire spine from the skull to the pelvis needs to be aligned to relieve neck pain and improve the posture of the cervical vertebrae. The three exercises presented below are examples of such integrative movements and positions.
Three Exercises for Neck Pain
During all of these exercises, you will want to practice diaphragmatic breathing. When correctly done, your lower ribs, at the level of your respiratory diaphragm, will expand all around your torso in a 360-degree movement. You want to inhale through your nose, exhale out your mouth, and hold the exhale for at least 2 seconds before taking your next breath.
 Flexion Abdominals with Neck Rotations on a Roll
- Position yourself on your back and place your feet on a wall. Now scoot close to the wall. You should be closer than 90 degrees, in deep hip flexion. If you can side bend and reach the wall with your hand, you are close enough.
- Next, place a small block between your knees. The block should position your knees about 4” apart. Now, squeeze gently. Hold this contraction for the duration of the exercise.
- Then, place a small towel or neck roll as low as you can at the base of your neck. This creates the proper backwards (lordotic) curve and allows the cervical spine to drape over the roll in a relaxed position.
- Perform the exercise by slowly rotating your head from left to right. This will mobilize the bony structures of the neck. Keep your chin down to ensure the neck stays long as you move.
- Start with a small range of motion and gradually increase how far you go. You may hear some popping and cracking with this one--I do! This should settle down as your neck loosens. Stop if it is painful.
- Complete 10 rotations to each side and work up to doing three sets of 10.
Dr. Rothman, who contributed to the previous blog Neck Pain and Posture, provides an analysis of this exercise:
The hips and knees are positioned to engage the hip flexor muscles, relax the low back, and lengthen the paraspinal muscles (muscles on either side of the spine that span from the pelvis to the head). Gently squeezing the block activates the adductor muscles of the inner thighs to help stabilize the pelvis. This, in turn, promotes better spine alignment all the way through the neck. Arms are extended out to the sides to position the shoulder blades properly in relation to the hips. The neck roll is pulled down toward the traps but not under the traps to create a more horizontal line across the shoulders. The roll promotes a better cervical curve. Adding the head and neck rotations increases motion in all planes of motion–sagittal, frontal, transverse. (Recall from our brief anatomy discussion that lateral bending does not occur without rotation.) This exercise reinforces good posture, balance, and alignment by applying principles of functional anatomy. The same applies to the two following exercises. And the good news is that it does not consume much time when done properly.

Hip Crossover Stretch
- Start by lying on your back with your knees bent at 90 degrees and your feet on the floor.
- Before moving, ensure your hips, knees, and ankles are in line with each other and your feet are pointing straight ahead.
- Now, check your upper body. Your arms should be straight out from your shoulders, with your palms down and your fingers spread.
- Stabilize your upper back by pressing lightly into the ground. You should feel a lengthening across your chest as your shoulder blades move down and together.
- Next, cross your right ankle over your left knee. Then, slowly rotate your body to the left until your right foot touches the ground. Keep your left foot planted and rotated over it as your right foot comes to the ground. A common mistake is to let the left leg move right. However, since this reduces the stretch, pay attention to avoid this compensation. (Note: this position may create too much rotation for you at first. You can reduce the range of motion by propping your right foot and left knee up on a block, blanket, etc. This is how I started.)
- Once the lower body is rotated, turn your head in the opposite direction so that you are looking to your right. Try to rest your right ear on the floor.
- Now, relax your left leg and press your right knee out, toward your right. This will open the front of your right hip and engage your glutes on that side. Be mindful not to let the right foot come off the ground. Keep it solid.
- Hold for one to two minutes.
- Finish by rotating the whole body up together just like you did when you entered the position.
- Switch sides.
 Sitting Scapula Contractions with Strap
- Begin by sitting with your hips and knees at the same height or your hips slightly higher than your knees.
- Check that your feet are hip-width apart and pointing straight ahead.
- Notice the position of your sits bones (bones on the bottom of your pelvis). When the pelvis is correctly positioned in sitting, they are pointing straight down towards the ground.
- Observe that your upper body is positioned so that your shoulders are directly on top of your hips and your spine is in its natural curve.
- Now, position a non-elastic strap just above your knees, and press out. While pressing, your knees should be in-line or slightly inside your hips. Maintain a moderate pressure on the strap throughout the exercise.
- Next, exhale out your mouth and pull your shoulder blades down and together so that they move in towards your spine. You should feel your chest open and your shoulders roll back.
- Hold the contraction for at least two seconds.
- Then, inhale through your nose and let the shoulders relax.
- Complete 10 repetitions and work up to doing three sets of 10.
Summary
Neck pain is frequently due to poor posture, though this is often an overlooked cause. This is partly because poor posture is so common that it is not recognized by health providers. Consequently, invasive procedures are often done to alleviate the pain, but they only offer temporary relief.
Our necks are strong and resilient! However, they are routinely held in compromised positions that lead to pain. During our day, we reach with our hands in front of us to our keyboards, steering wheels, or phones. These are all actions that bring our heads forward and down, round our shoulders and upper back, change the curve in our lower back, and compromise our pelvic position.
Although we cannot change the demands of our modern world and the poor postures that come with it, we can alter our alignment and relieve neck pain for the long-term. This requires treating the whole spine, from the pelvis to the skull. The exercises presented in this blog help to keep your spine healthy and strong and prevent you from becoming stuck in a painful position.
Stay connected with news and updates!
Join our mailing list to receive the latest news and updates from me.
Don't worry, your information will not be shared.
We hate SPAM. We will never sell your information, for any reason.