
5 Alignment Exercises for Snow Sports
Dec 21, 2015
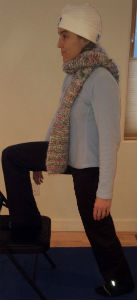
It’s that time of year: the hills are white, and the trails are groomed! Time to get out on the snow!
I love winter and the sports it brings! Going from dryland training to skiing or boarding day after day, however, can be a hard transition for your body. Like all sports, sliding on snow has specific muscular demands and requires precise body positions to maintain balance on a slippery surface. Some muscle groups become tense and short from overuse, while others are underutilized. This uneven use of the body creates alignment imbalances that, if not counteracted, will likely become worse with each additional day on the snow.
Snow sports are unique in that they are so weather and condition dependent. And when it’s good, you want to be out there, not nursing pain or sore muscles at home. Take a few minutes to do the exercises below after a day of snow cruising to keep your body balanced, reduce your risk of injury, and, most importantly, enhance your play time on the snow.
Exercise 1: Standing Hip Flexor Stretch
(from the Postural Restoration Institute®)
When skiing and boarding, your body is in a hip flexed position. Essentially, your upper body is bent forward at the waist, with the muscles on the front of your hip (hip flexors) holding your pelvis in this forward-rotated position. In addition to holding your posture, the hip flexors are also under a lot of load while you’re moving, more or less so depending on your activity. I’m always well aware of my hip flexors after my first time out on my classic cross-country skis, which requires great effort from the hip flexors. A shortening of these muscles pulls the pelvis forward into an anterior tilt. Recall my blog: 5 Exercises to Reduce Anterior Pelvic Tilt. This exercise helps to release the tension in the hip flexors, allowing the pelvis rotate back towards neutral.
First, stand with one foot on a chair. Now, place your hands on your hips and tuck your pelvis under. You want to lengthen your lower back and feel a stretch in the front of your standing hip. While maintaining this posterior pelvic position, lunge forward slightly, and keep your heel on the floor. Next, bring the hand that is near your standing leg behind you slightly. This will rotate your spine in the direction of the standing leg and will increase the lengthening of the hip flexor. Hold the position for five or more deep breaths, in through your nose and out through your mouth. Repeat 3-5 times on each side. If you notice one side is tighter, go ahead and do additional repetitions on that side. Your goal is symmetry in your muscles.

Exercise 2: Knee Drops
(from The Egoscue Method®)
This exercise builds on the last one, moving into more of the hip musculature, including the rotational muscles along with the quadriceps and inner/outer thighs. First, lie on the ground with your knees bent at 90 degrees and arms relaxed out to your sides. Position your feet wide and straight. Tip: To maintain the position of your feet, put your toes against the wall, as shown. Now, drop both knees to one side and rotate your head in the opposite direction. Try to reach the floor with your ear. Start slowly and build up to a comfortable range of motion. Hold each position for 1-2 seconds; then, switch to the other side. Keep your upper body relaxed as you move your lower body. Repeat 20 times.

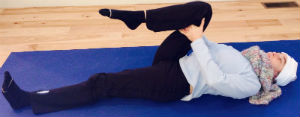
Exercise 3: Table Top Hip Lifts
(from the Postural Restoration Institute®)
Now that your hips are more mobile and your pelvis is moving easier, you’ll actively pull your pelvis back into alignment with this exercise. Snow sports tends to overuse the front of the body, so this exercise balances that muscle work with activation of your hamstrings and gluteals. This exercise will also open up the chest and reposition the upper body, which has been rounded forward during your time on the snow.
Start sitting with your hands pointed out behind you and your knees bent at 90 degrees. While keeping your feet flat on the ground, pull back into your heels to engage your hamstrings (back of your upper legs). Now, take a breath in through your nose. Then, as you exhale, lower your ribs down, back and in, anchored towards your center. Next, while keeping your ribs anchored, and continuing to dig your heels into the ground, lift your hips up using your gluteal muscles. As you lift, bring your shoulder blades together while keeping your neck relaxed. Throughout this exercise, maintain awareness of your feet, especially your heels and arches throughout the exercise. Hold at the top while still exhaling; then, lower as you inhale. Lift as you exhale and lower as your inhale. Repeat 10-30 times.
 Exercise 4: Supine Foot Circles and Point Flexes
(from The Egoscue Method®)
Snow boots hold your feet in a fixed position. This exercise not only increases foot mobility but also strengthens hip musculature, improves coordination of the kinetic chain from the foot to the hip, and improves upper body position.
While lying on your back, bring one knee into your chest with your hands holding behind your knee. Now, extend your other leg and flex your toes back strongly. As you do this, engage your upper leg (quadriceps) by pressing your knee towards the floor. You may feel muscle activity all the way up from your foot to your hip. Next, pinch your shoulder blades down and together into the floor, attempting to keep your ribs anchored and lower back flat. Rotate your elevated foot for 20 circles outward, 20 circles inward and 20 points and flexes. Switch legs and repeat.

Exercise 5: Standing Windmill
(from The Egoscue Method®)
Typical athletic posture for snow sports includes a rounding forward of the upper body and compression of the sides. This exercise re-establishes flexibility in these areas and also stabilizes the pelvis.
First, stand with your back to a wall and heels as close to the wall as possible, preferably touching. Now, bring your arms up with the palms out to be level with your shoulders. While in this position, stretch your arms out from your body to feel a pull through your chest and upper back under the shoulder blades. Then, lightly pinch your shoulder blades together and ribs down.
Next, keeping your hips stationary and feet evenly balanced, bend your body sideways as far as comfortable without losing position. When you do this, you will feel the lengthening in your opposite side of your body. Now, bring your body back up to the center then over to the other side. Notice if one side is easier. Complete four sets of five repetitions to each side. The first set is with your feet hip-width apart. The second set is with your feet shoulder-width apart. The third set with with your feet as wide as comfortable. And the last set is the same as the first, with your feet in a hip-width position.
Stay connected with news and updates!
Join our mailing list to receive the latest news and updates from me.
Don't worry, your information will not be shared.
We hate SPAM. We will never sell your information, for any reason.